Simulating Infrared Ektachrome "false color" photos with an unmodified digital camera and an R72 filter
This page explains the procedure I use. If you wish, you can also download two free Photoshop actions to simplify the process.
These are the steps in outline:
(1) Take a color photo in the usual way
(2) Take the same photo with the R72 filter
(3) Extract the Red channel from the IR image to produce a monochrome image
(4) Move the image in the Green channel of the color photo to the Blue channel, and move the image in the Red channel to the Green channel. Then replace the image in the Red channel with the IR monochrome image.
The Photoshop actions available below simplify steps (3) and (4).

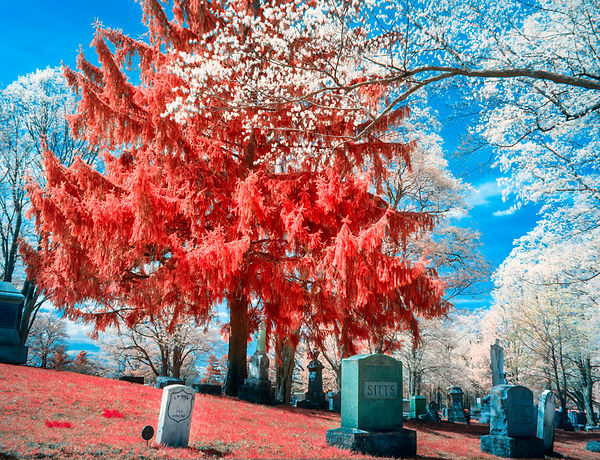
Here are a few examples of false-color images produced in this way:


Notes on equipment and technique
Tripod: a tripod is obviously essential since the color and IR images need to register. Also the exposure in sunlight through the R72 filter is usually several seconds. Windy days can be a problem, since leaves and clouds both tend to move around.
Focus: I use the camera's auto focus for both the color and IR photos. Visible and IR light focus on different planes, so you can't obtain accurate IR focus by eye. Since my Olympus is a mirrorless camera which sets focus based only on the sensor image, this is not a problem.
R72 filter: Although my Hoya R72 filter is a 62mm thread, I've been using it mostly with the Olympus 17mm f1.8 and "bodycap" fisheye lenses. It's much easier to just hold the filter in front of the lens than to constantly mount and unmount it.
Exposure: I suggest that you override the camera meter's exposure settings when using the R72 filter by about minus .7 stop. Otherwise the image in the red channel, which is all that matters, tends to be overexposed.
Notes on the Photoshop actions
The action called "Mono IR conversion" replaces all three color channels in the original image with the image from the Red channel. The images in the Green and Blue channels are dark and really just represent "leakage" through the R72 filter. The actual IR image is in the Red channel.
To use the action, just open the R72 image, which will appear very red, in Photoshop and run the action. In addition to converting the image to monochrome, it places a Levels adjustment layer above the processed image with Auto checked:

This usually sets a satisfactory black and white point, but you may need to modify these and/or the midpoint to produce a pleasing tonal scale. For your convenience the adjusted image is automatically copied to the clipboard, so that it can be pasted above the color image prior to using the action described below.
The "False color IR Ektachrome" action requires the mono IR image to be in an image layer above the color photo, as shown here:

You can paste this image from the clipboard after using the previous action and switching to the color photo, or you can open the IR mono and color images as layers in Photoshop from Lightroom. It doesn't matter how you do it, as long as the IR image is in a separate layer above the color image.
When the action is complete, the layer stack will be as shown:

The monochrome IR image is still in the top layer, but its visibility is turned off. Likewise the original color image remains in the bottom layer, but is covered by the simulated Infrared Ektachrome image layer above it.
The action also adds two adjustment layers. The Hue/Saturation layer makes some major hue shifts to produce a more accurate simulation of the film colors, as well as being more pleasing. The overall color balance is further modified by the Levels adjustment layer to produce "cleaner" neutrals. Obviously both of these can be adjusted to taste. Some additional processing in Lightroom, particularly in regard to White Balance, is usually also desirable.
There are usually some transparent pixels on two or more edges which need to cropped off. These result from the layer alignment step in the action
Another treatment
A "white on blue" effect can be obtained by turning on the visibility of the top (infrared mono) layer and setting its blend mode to Lighten.

Ektachrome Infrared simulation

with mono image in top layer visible and set to Lighten blend

Ektachrome Infrared simulation

with mono image in top layer visible and set to Lighten blend
And here are the actions
Download the ZIP file by clicking the icon below and unzip it. Then just double-click the .atn file to load the action set into Photoshop.
Bonus false-color action
You don't need to shoot infrared to produce false-color photos, this can be done just by swapping the red, green and blue color channels around. The action in the ZIP file below does this in all possible ways. The layer names indicate the order in which the original channels ended up. Click the visibility of the layers off, starting at the top, to see each result. The layer just about the original background image is a 180-degree hue rotation.
After loading the action set, open any flat image and run the Channel swapper action. The other actions in the set are used within this action.